
How to Trim and Cut videos with VLC Media Player
VLC offers the option of using the Record button (as covered earlier) to allow users to save a portion of the video clip that is currently being played. However, the problem with using the Record button for cutting videos is that you need to actually play the entire portion of the video that you need. This makes it especially difficult to cut lengthy portions of a video. Moreover, exact start and stop times are difficult to maintain. This article offers a better way to cut videos with VLC media player that solves both these problems.

How to use VLC as a video cutting tool
To cut videos in VLC, follow the steps given below:-
1) Open VLC media player.
2) Play the video which you want to trim and note the time in the video from where you want to obtain the trimmed video and also note the end time up to which you want the video to be trimmed. Take the time in seconds. For example, if you want to start cutting from 2 minutes and 30 seconds and end cutting at 5 minutes and 4 seconds, the start time will be (60*2 + 30)=150 seconds and stop time will be (60*5 + 4) = 304 seconds. These values will be needed later.
3) Now, click on Media in the Menu bar.
4) In the dropdown menu, click on Convert/Save. Alternatively, you can press Ctrl+R shortcut key combination to directly reach media options.
5) Click on the Add button on the right of the File selection box to load the video which you want to cut.
6) Tick show more options on the bottom left side of the dialog box to show extended options.
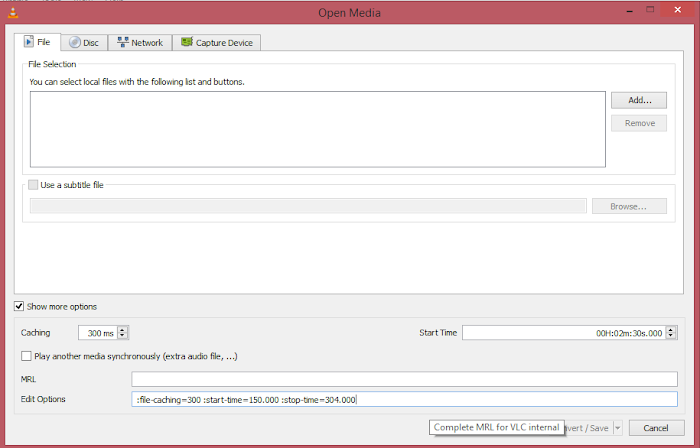
7) In the extended options, enter the start time which you noted earlier. Notice that in the Edit options field, a :start-time=### string will be added. There is not an option to add the stop time. So, you need to add the stop-time in the same format in the edit options manually, ie. add “:stop-time=###” without quotes in the edit options where ### is the stopping time in seconds. For our example, the edit option text field should look like that in the image given below:-
2) Play the video which you want to trim and note the time in the video from where you want to obtain the trimmed video and also note the end time up to which you want the video to be trimmed. Take the time in seconds. For example, if you want to start cutting from 2 minutes and 30 seconds and end cutting at 5 minutes and 4 seconds, the start time will be (60*2 + 30)=150 seconds and stop time will be (60*5 + 4) = 304 seconds. These values will be needed later.
3) Now, click on Media in the Menu bar.
4) In the dropdown menu, click on Convert/Save. Alternatively, you can press Ctrl+R shortcut key combination to directly reach media options.
5) Click on the Add button on the right of the File selection box to load the video which you want to cut.
6) Tick show more options on the bottom left side of the dialog box to show extended options.
7) In the extended options, enter the start time which you noted earlier. Notice that in the Edit options field, a :start-time=### string will be added. There is not an option to add the stop time. So, you need to add the stop-time in the same format in the edit options manually, ie. add “:stop-time=###” without quotes in the edit options where ### is the stopping time in seconds. For our example, the edit option text field should look like that in the image given below:-
8) Click on Convert/Save on the bottom right side and follow all the steps to convert a video in VLC. To see the steps on how to convert a video, see this post.
9) In the following dialog box, click on browse to select the destination where your trimmed video will be saved.
10) Click on Start to begin the cutting process.
9) In the following dialog box, click on browse to select the destination where your trimmed video will be saved.
10) Click on Start to begin the cutting process.
VLC’s progress bar will show progress. Do not close the player at this stage as it will result in the output video getting corrupted.
Note: On some older PCs, after the cutting process is completed, VLC may become unresponsive. If that happens, just close VLC Media Player with the Task Manager. This will not affect the trimmed video.
The speed with which VLC cuts the video will depend upon your computer’s specifications. A faster computer cuts quickly while slower PCs take a lot of time.
Formats supported:
VLC can be used to cut videos of all formats that it can play. This means that you can use VLC to cut videos of the following:-
VLC can be used to cut videos of all formats that it can play. This means that you can use VLC to cut videos of the following:-
Container formats: 3GP, ASF, AVI, DVR-MS, FLV, Matroska (MKV), QuickTime File Format, MP4, MPEG-2 (ES, PS, TS, PVA), Raw DV, MXF, VOB, RM, DVD-Video, VCD, SVCD, DVBandVideo formats: Cinepak, Dirac, DV, H.263, H.264/MPEG-4 AVC, H.265/MPEG HEVC, HuffYUV, Indeo 3, MJPEG, MPEG-1, MPEG-2, MPEG-4 Part 2, RealVideo 3 & 4, Sorenson, Theora, VC-1, VP5, VP6, VP8, VP9, DNxHD, ProRes and some WMV.
This is dummy text. It is not meant to be read. Accordingly, it is difficult to figure out when to end it. But then, this is dummy text. It is not meant to be read. Period.
ConversionConversion EmoticonEmoticon